THE MICROSCOPE
The light microscope is one of the most basic and essential equipment used in any laboratory. It is used for visualising very small objects like cells, bacteria, parasites, their ova/cysts and crystals etc., that are otherwise not visible to the naked eye. It comprises a series of lenses,which magnify an illuminated small object several times to make it recognisable with the naked eye and to study its details. Such a microscope is called compound light microscope. Adjustment of the microscope’s illumination and optical system for optimum contrast and resolution is crucial for accurate recognition of the image produced and studying its details. The capabilities of a light microscope can only be best utilised if the laboratory technologist or pathologist fully understands the basic principals of image formation, microscope components and their functions. Whether a light microscope is monocular (having one eyepiece) or binocular (having two eyepieces) or multihead (used by more than one observers simultaneously) the basic components remain the same. It has three basic components:
- Foot piece
- Body
- Eye piece
FOOT PIECE
It forms the base of the microscope and provides stability to the body and eyepieces. The light source, with or without its controls, is usually incorporated in the base. In some old or field microscopes a mirror is provided in place of a light source. This allows the use of natural or external source of light to illuminate the object. One side of the mirror is concave and is used when more intense light is required to illuminate a small field. The other side of the mirror is convex and is used when less intense (diffuse) light is required to illuminate a broad field.
BODY
The body of the microscope is mounted on the foot piece. It holds a sub-stage condenser, a stage and a nosepiece. Sub-stage condenser is composed of a system of lenses and diaphragm. The intensity of light and the size of field illuminated by it are controlled by moving the condenser up or down and adjusting the aperture of the diaphragm. The stage is a device for holding the objects for examination. It has a hole in the middle over which the object is placed. Exactly underneath the hole is the substage condenser. The stage may be a fixed stage with clips to hold the object in place. But in most microscopes it is provided with a mechanical device to move the object in both planes (mechanical stage). The device is marked on both axes for noting the grid reference of the field examined. This helps in localising the field in future examination of the same object. Nosepiece is the part of the body, which holds the objectives. In modern microscopes it comprises a revolving device to hold 4-5 objectives of different magnification. The device helps in bringing the required objective over the object for examination. An objective comprises a system of lenses, which magnify the image several times. Each objective is marked with a coloured line, which indicates its magnification. The magnification is also engraved on the objective in numeric along with other information. For example a dry high power objective has a blue line and is engraved withfollowing:
Plan 40/0.65
160/0.17
This means that this particular objective has a magnification of x40 and has a numerical aperture 0.65 at a tube length of 160 mm when a cover glass of 0.17 mm thickness is used. Word Plan denotes the type of objective. Following are the common objectives installed in an ordinary light microscope:
- Scanner: Red line, x4 magnification
- Low power: Yellow line, x10 magnification
- Dry high power: Blue line, x 40 magnification
- Oil immersion: White line, x100 magnification
EYEPIECE
The observer, to look at the object under examination uses this part of the microscope. The microscope having one eyepiece is called monocular whereas the microscope with two eyepieces is called binocular microscope. The eyepiece consists of a system of lenses that further magnify the image produced by the objective. The magnification power of the eyepiece is inscribed on it e.g., x10. In binocular microscope two eyepieces are installed in a tube provided with a prism to divert the incident light to both eyepieces equally. The observer can adjust the distance between two eyepieces (inter-pupillary distance) to his convenience. Movement of the eyepiece in the holding tube allows diopter setting for an individual observer.
HOW TO OPERATE A COMPOUND LIGHT MICROSCOPE
- The microscope should be placed on a level bench, which should be free of vibrations.
- The power socket, to which the microscope is plugged, should not be loose and sparking.
- The height of the microscope or chair should be adjusted in such a way that the eyes of the user are right on the eyepieces while maintaining the normal curvatures of the backbone.
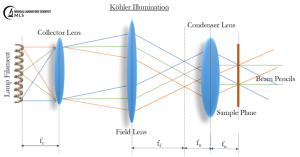
- The microscope should then be adjusted for the optimum resolution and contrast to ensure maximum definition of specimen details. It can be done by using Köehler technique as under:
Kohler Illumination
- Turn on the microscope at very low illumination and give 1-2 min to the filament of the bulb to warm. Then adjust the light intensity.
- Place the specimen on the stage, switch to x10 objective and focus.
- Close the iris diaphragm of the substage condenser and raise the substage condenser to the top “stop”.
- Close the field iris diaphragm of the light assembly in the body.
- Move the sub-stage condenser down until the image of the field iris diaphragm is in sharp focus.
- Now re-focus the specimen.
- Centre field diaphragm image by using adjustment screws in the condenser.
- Enlarge field diaphragm image until it is just out of the field of view and the entire area under observation is illuminated.
- Remove one eyepiece and look down the tube.
- Adjust the aperture of diaphragm while observing the circular beam of the light so the light beam fills 75% of the field.
- Replace the eyepiece. Adjust the diopter
- setting and inter-pupillary distance.
Place your forearms flat on the surface of the table while using microscope. Periodically look away, preferably out of window or to a picture or any pleasant object.
OIL IMMERSION MICROSCOPY
Oil immersion microscopy is extensively used to identify very small objects and to study finer details of the cells. It requires the use of specially constructed objectives with a small working distance. Air (refractive index 1.0) in the light path of the object space is replaced with oil (refractive index 1.5-1.6). This improves resolution. Oil immersion objectives of various magnifications are available but the most commonly used has a magnification of x100. Following procedure should be adopted for oil immersion microscopy:
- Adjust the microscope.
- Place the object on the stage and focus with x10 objective.
- Select the viewing area.
- Rotate the objective out of light path.
- Place a drop of oil over the object, in the centre of light beam.
- Watching from the side, carefully swing in the oil immersion objective.
- Focus carefully using fine adjustment knob.
- After examination wipe off the oil and clean the objective as well as the object with a piece of soft tissue paper.
MICROSCOPE CARE
Microscope is very delicate equipment. Appropriate maintenance not only improves precision but also rises its life. Following points are useful in the maintenance of microscope:
- Protect from heat.
- Clean it daily. When not in use, keep it covered with a plastic cover or a piece of cloth but not with mesh gauze.
- Clean the objectives with soft tissue paper soaked in xylol and then with lint free cloth.
- Be careful as excess of xylol may dissolve. The cement with which lens is fixed in the objective and may trickle into it.
- Do not clean with alcohol.
- Remove the dust from the eyepieces with the help of soft tissue paper.
- Always use soft tissue paper or lint free cloth for cleaning lenses and never rub but wipe gently.
- This protects lenses from scratches.
- Switch off the power at the end of microscopy session.
MICROSCOPE TROUBLESHOOTING
- No light: This may happen if the power connection is loose, the bulb is loose or fused, brightness control dial is at lowest level, objective is not clicked in place, diaphragm is completely closed or not centered or fuse is blown. The cause should be recognized and removed.
- Insufficient light: This may result from low set brightness control dial, too low condenser and closed condenser diaphragm. Check and correct accordingly.
- Too bright light: Brightness control set too high for the objective being used.
- Flickering: Flickering results from loose power connection, defective bulb socket, corrosion of bulb pins and improperly installed bulb.
- Does not focus with high objective: The specimen slide is placed upside down.
- Bubbles or dark waves across the field: Contact between the oil and oil immersion objective is broken. Clean the slide and add more oil.












Thanks
[…] MICROSCOPE: PARTS | OPERATION | CARE | TROUBLESHOOTING […]
[…] MICROSCOPE: PARTS | OPERATION | CARE | TROUBLESHOOTING […]